
Cold-Weather Cultivation: 8 Steps to Winter Sowing and Seed Stratification

Winter Sowing: Start Seeds Even in the Cold Months
No need to let winter slow you down in the garden! Winter sowing uses simple containers or controlled cold environments like your refrigerator to mimic the natural conditions many native seeds need to germinate. Both approaches offer low‑cost, low‑effort ways to stay connected to gardening during the colder months while giving native seeds the essential cold exposure they need to grow strong.
Many native plants and wildflowers require cold temperatures before they sprout. This process, known as cold stratification, signals to the seed that winter has passed and it’s safe to begin growing.
Gardeners can create these conditions in two primary ways: outdoors, using containers that act like mini‑greenhouses, or indoors, using the refrigerator to provide consistent, reliable cold stratification. Each method is simple, effective, and easy to customize based on your space and climate.
Below are two ways to get started!
Method 1: Outdoor Winter Sowing in Containers
This method can be used when temperatures remain cold, ideally between January and March. If you are sowing later in the growing season, read ahead to follow method 2 about winter sowing in the refrigerator.
Step 1: Gather Containers
Collect milk jugs, vinegar jugs, or similar containers. Choose vessels tall enough to hold about 3 inches of soil plus the space needed for seedlings to grow.
Two-liter soda bottles, takeout containers, or repurposed rotisserie chicken containers can also work well for this project.
Step 2: Prepare the Containers
Create drainage holes in the bottom of the container. A helpful trick is to heat the tip of a Phillips screwdriver over a flame to easily puncture plastic.
Next, cut the container around 4 inches from the bottom, leaving an inch or two intact near the handle so it acts like a hinge.
Step 3: Fill with Damp Soil
Fill the bottom portion with about 3 inches of moist potting soil. The soil should be damp but not soaking wet.


Step 4: Sow the Seeds
Plant your seeds according to their recommended depth. Some seeds prefer to sit right on the soil surface, while others should be lightly covered.
Labeling (Optional but Recommended)
Add a plant label so you remember what you planted.
Pro tip: Permanent marker can fade in sunlight. Placing the label inside the jug helps protect it from the elements.


Step 5: Seal and Secure
Close the jug and secure it with duct tape around the seam. Leave the plastic cap off so rainwater and airflow can enter the container.
Step 6: Outdoor Placement
Place the container outdoors in a sunny location where it will receive natural rainfall. Avoid placing it under roof eaves or other areas where rain cannot reach it.

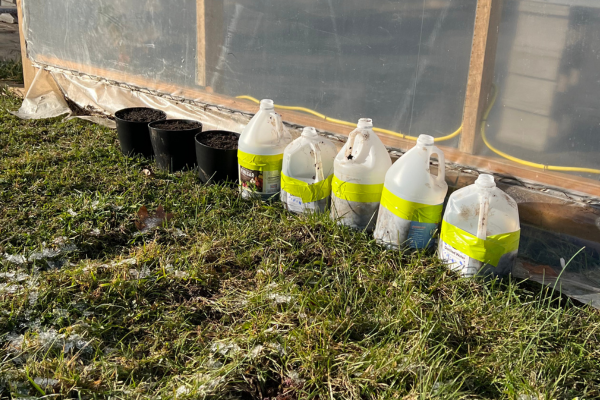
Step 7: Monitor Temperatures
Keep an eye on unexpected warm spells. If the temperature becomes too warm, you can remove the tape and open the container temporarily to prevent overheating.
Step 8: Transplanting Time
Once the seedlings are healthy and filling the container, they’re ready to be transplanted into the garden or larger pots.
Method 2: Winter Sowing in the Refrigerator
If outdoor winter sowing isn’t an option, you can recreate winter conditions using your refrigerator.
Step 1: Prepare a Seed Packet
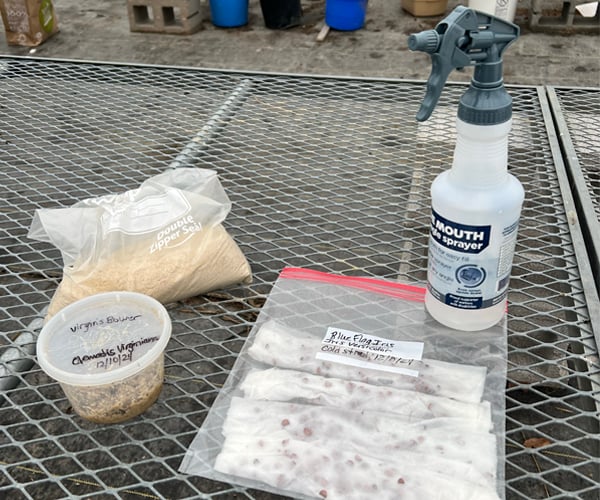
Place your seeds in a small plastic bag or container with slightly damp paper towel, sand, or seed-starting mix. Peat is our preferred medium for this process to prevent mold growth. The medium should be damp but not saturated, as too much water can cause seeds to rot.
Step 2: Label and Seal
Clearly label the bag or container with the seed type and date. Seal it loosely so air can still circulate.
Step 3: Refrigerate
Place the container in your refrigerator (not the freezer) for four to eight weeks, depending on the plant species. This cold period mimics winter conditions and helps break seed dormancy.
Step 4: Plant the Seeds
After the cold period, remove the seeds and plant them in pots or seed trays with fresh soil. Place them under grow lights or in a sunny window to begin germination.
Why Winter Sowing Works
As those winter-planted seeds begin to sprout into lively green seedlings, winter sowing becomes a reminder of nature’s resilience. By turning everyday containers, or even your refrigerator, into tools for seed starting, gardeners can work alongside the natural rhythms of the seasons.
Winter sowing doesn’t just extend the gardening season. It invites you to witness the quiet magic of life beginning long before spring officially arrives.
More Articles for a Healthy Yard and Home
Winter Sowing Native Plants: A Simple Guide to Growing Habitat at Home
Watch our Winter Sowing Workshop Full Transcript: Welcome everyone. I'm Danielle, the Stewardship and Outreach coordinator at West Creek...

How to Plant Stratified Acorns
Why You Should Avoid Potting in Nursing Pots Planting from seed takes a little patience up front, but a tree planted from seed will quickly outgrow...
How To Fight Stream Pollution Through Effective Stormwater Management
In this guide, we’ll explore and address how pollutant loading in streams is crucial for the well-being of both watersheds and communities.

Roots of Sustainability: Understanding the Importance of Trees in Urban Living
A healthy urban tree canopy has a profound and positive impact on community quality of life in various ways. Recognizing the value of urban trees and investing in their preservation can contribute to sustainable, resilient, and vibrant urban living.
Shrink Your Lawn: A Guide to Growing More Native Plants
In this guide, we’ll explore the importance of reducing your lawn’s size and explain the many benefits it brings, both for your wallet and the environment.
How to Know When Native Seedlings are Ready to be Harvested
It is important to determine when native seedlings are ready for harvest. Not sure how to? Check out our guide to harvesting native seedlings.
Harvesting Guide for Native Seedlings and Plants
Creekside Collaborative is always in need of native trees and seedlings. To get your native plants to the nursery, follow this harvesting guide.
How to Add Native Plants to Your Garden
Many of us have chosen to cultivate species and landscapes that are not naturally-occurring in our region. It’s wasteful, expensive and detrimental to wildlife who encounter reduced availability of the native species upon which they feed.
Wildlife-Friendly Fall Yard Cleanup
Before any landscape program begins, assess the current conditions of your home landscape. This assessment will help you to identify and prioritize future projects and allow you to appreciate all the positive changes you’ve made.
Composting 101
Before any landscape program begins, assess the current conditions of your home landscape. This assessment will help you to identify and prioritize future projects and allow you to appreciate all the positive changes you’ve made.